The Re-Birth of a Scout

Awesome thread and it looks like you're doing a great job. Thanks for sharing.
It will all be worth it when you splash it:driving:
 
At this point the gas tank was next.. What the heck do you do with ~20 gallons of gas???

I had to get rid of 60 when I cut my tank out this summer. I opened a free gas station for about an hour. I think that Phragle may have gotten in on it. :D
Great pics. Thanks for sharing. Keep up the great work.
 
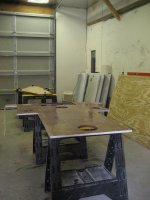
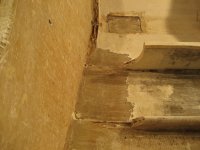
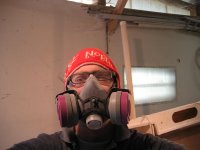
And the work progressed. These pictures were taken around May 17th. I bought the most expensive resperator I could find at the store and started to grind.... What a nasty job.... That is one thing I dont enjoy! I couldnt beleive how white the shop got. Dust every were!! I found the best thing to use for this was a grinder with a 36 grit "Abrassive Nutted Flap Disc"
 

Attachments

  • Week 10 5-17-09 010.jpg
    Week 10 5-17-09 010.jpg
    100.4 KB · Views: 19
  • Week 10 5-17-09 011.jpg
    Week 10 5-17-09 011.jpg
    93.5 KB · Views: 17
  • Week 10 5-17-09 014.jpg
    Week 10 5-17-09 014.jpg
    89.7 KB · Views: 15
I found out, Dont use the 3M sandblaster flap disc with out using the quick change piece. I had it break apart on me. Thank the lord I was in the right place at the right time. Remenants of it is still stuck in the ceiling of the shop.....
 

Attachments

  • Week 10 5-17-09 017.jpg
    Week 10 5-17-09 017.jpg
    77.9 KB · Views: 12
  • Week 10 5-17-09 022.jpg
    Week 10 5-17-09 022.jpg
    80.3 KB · Views: 13
  • Week 10 5-17-09 024.jpg
    Week 10 5-17-09 024.jpg
    57.6 KB · Views: 12
Holy Dust!!
 

Attachments

  • Week 10 5-17-09 026.jpg
    Week 10 5-17-09 026.jpg
    62.7 KB · Views: 15
  • Week 10 5-17-09 025.jpg
    Week 10 5-17-09 025.jpg
    83 KB · Views: 12
  • Week 10 5-17-09 023.jpg
    Week 10 5-17-09 023.jpg
    61.3 KB · Views: 10
When I did mine, I had an old craftsman 2 speed electric grinder, looked like an impact gun as opposed to a buffer. Put 30 grit on it, low speed, you could put all your weight on it and itwould brown all the lights in the neighborhood but i would just keep digging. Finally gave up on me..it had to have been 35+ years old. If anyone knows where I can get another one or a new set of gears, I would be foever gratefull!
 
get some flexible extension tubing for the shopvac, and tape it to you arm just up from your wrist.
 
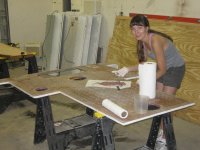
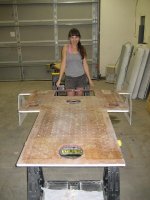
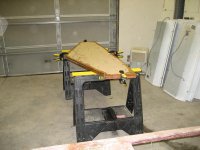
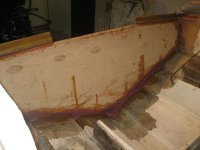
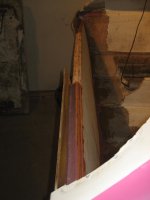
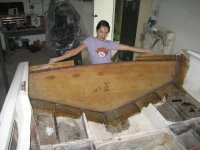
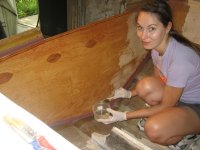
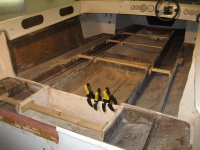
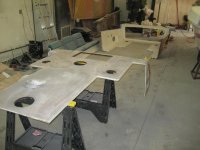
At this point I started to work on getting the Transom boards bonded toghether. After talking to Dave he suggested bonding them outside of the boat. I went with 3 layers of 1/2" marine ply with biax 1300 to connect them together. As Dave would say, It will be a "Bomber" set up :) ! At the same time Ang and I worked on the removable floor. That was eat'n up pretty good. Knowing that it wasnt structually, I followed the West systems book and created a grid patern on the backside and filled with thickend epoxies. I think it came out good.
 

Attachments

  • 6-12-2009 JohnsonCreek 002.jpg
    6-12-2009 JohnsonCreek 002.jpg
    99.9 KB · Views: 72
  • 6-12-2009 JohnsonCreek 005.jpg
    6-12-2009 JohnsonCreek 005.jpg
    102.7 KB · Views: 92
  • 6-12-2009 JohnsonCreek 006.jpg
    6-12-2009 JohnsonCreek 006.jpg
    96.9 KB · Views: 28
Floors done and the transom is bonded together..
 

Attachments

  • 6-12-2009 JohnsonCreek 008.jpg
    6-12-2009 JohnsonCreek 008.jpg
    84.2 KB · Views: 21
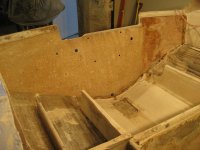
Fast foward. Its the begining of August and it was time to glass in the transom. Like I said. I was only working on it on the weekends. I missed some weekends traveling back to Ohio to go out on the gun & hangind at the Casino,
 

Attachments

  • 7-4-2009 Cleveland&KellysIsland 109.jpg
    7-4-2009 Cleveland&KellysIsland 109.jpg
    108.3 KB · Views: 55
  • 7-4-2009 Cleveland&KellysIsland 108.jpg
    7-4-2009 Cleveland&KellysIsland 108.jpg
    69.3 KB · Views: 37
  • 7-4-2009 Cleveland&KellysIsland 128.jpg
    7-4-2009 Cleveland&KellysIsland 128.jpg
    92.4 KB · Views: 23
.....................
 

Attachments

  • 7-4-2009 Cleveland&KellysIsland 164.jpg
    7-4-2009 Cleveland&KellysIsland 164.jpg
    99.6 KB · Views: 34
  • 7-4-2009 Cleveland&KellysIsland 102.jpg
    7-4-2009 Cleveland&KellysIsland 102.jpg
    127.2 KB · Views: 23
  • 7-4-2009 Cleveland&KellysIsland 100.jpg
    7-4-2009 Cleveland&KellysIsland 100.jpg
    88 KB · Views: 26
checking out the chain of lakes,
 

Attachments

  • Chain O Lakes 7-25-2009 068.jpg
    Chain O Lakes 7-25-2009 068.jpg
    105.1 KB · Views: 50
  • Chain O Lakes 7-25-2009 054.jpg
    Chain O Lakes 7-25-2009 054.jpg
    108.2 KB · Views: 16
  • Chain O Lakes 7-25-2009 076.jpg
    Chain O Lakes 7-25-2009 076.jpg
    107.2 KB · Views: 20
Michigan City SBI,
 

Attachments

  • 8-21-2009 Michigan City - SBI 017.jpg
    8-21-2009 Michigan City - SBI 017.jpg
    101.7 KB · Views: 17
  • 8-21-2009 Michigan City - SBI 115.jpg
    8-21-2009 Michigan City - SBI 115.jpg
    87.8 KB · Views: 41
  • 8-21-2009 Michigan City - SBI 152.jpg
    8-21-2009 Michigan City - SBI 152.jpg
    96.5 KB · Views: 26
J- your standing awfully close to Stecz in that picture... are you really sure you want people seeing you that close????
 
and just enjoying the summer since I knew the boat wouldnt be done for summer 09'
 

Attachments

  • 2ndAnualLaborDayHoreFamilyReuinin 047.jpg
    2ndAnualLaborDayHoreFamilyReuinin 047.jpg
    88.3 KB · Views: 19
  • 2ndAnualLaborDayHoreFamilyReuinin 027.jpg
    2ndAnualLaborDayHoreFamilyReuinin 027.jpg
    130.6 KB · Views: 29
  • DSCN6586.jpg
    DSCN6586.jpg
    85.3 KB · Views: 18
J- your standing awfully close to Stecz in that picture... are you really sure you want people seeing you that close????

Funny thing, I kept asking him where the kool aid and sheep were.... His response was, "All I have is this 20oz of Diet pepsi and I dont know what you mean by sheep." Too funny :)
 
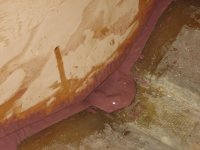
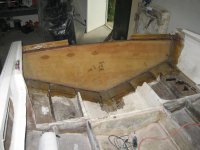
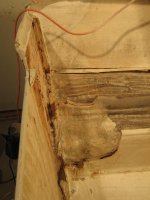
ok, back to work... I bonded the transom in and filled in the gaps. I thought it would stick and hold good. I came back the next day to see it spouged out.. That created more work! So I ground down what didnt need to be there and added more..
 

Attachments

  • 8-6-2009 001.jpg
    8-6-2009 001.jpg
    78.5 KB · Views: 13
  • 8-6-2009 002.jpg
    8-6-2009 002.jpg
    84.3 KB · Views: 24
  • 8-6-2009 003.jpg
    8-6-2009 003.jpg
    51.3 KB · Views: 18
Ang wetted it out and we applied 3 layers of 1700 biax plus tabbing.
 

Attachments

  • 8-6-2009 021.jpg
    8-6-2009 021.jpg
    100.2 KB · Views: 67
  • 8-6-2009 020.jpg
    8-6-2009 020.jpg
    101.4 KB · Views: 21
  • 8-6-2009 017.jpg
    8-6-2009 017.jpg
    90.4 KB · Views: 30
Funny thing, I kept asking him where the kool aid and sheep were.... His response was, "All I have is this 20oz of Diet pepsi and I dont know what you mean by sheep." Too funny :)


The funny thing is that the Pepsi he is holding isn't diet... that could explain why he looks 7 1/2 months pregnant.....
 
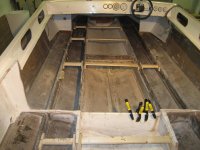
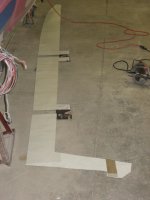
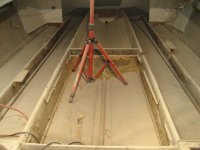
That was a big task completed. I was happy to have that behind me but, still knew there was alot of work ahead of me.... Before I cut out the stringes, I made some jigs to help keep them in place while glassing them in. I thought I would use my 2 levels to make sure they were straight and vertical and use door shims with the keep them in place. O yeah, I spent almost a whole Sunday making my pattern of the stringer to replace. Talk about art and craft fair. Fyi, I lucked out and found posterboard on sale at walgreens.... 5 cents a sheet... I cleaned them out :) To connect all the pieces together I used a hot glue gun and strips of cardboard to increase the rigidity of them.
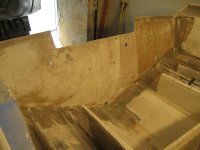
 

Attachments

  • 8-6-2009 022.jpg
    8-6-2009 022.jpg
    103.5 KB · Views: 12
  • 8-6-2009 023.jpg
    8-6-2009 023.jpg
    103.2 KB · Views: 12
  • 8-6-2009 024.jpg
    8-6-2009 024.jpg
    71.9 KB · Views: 10
Back
Top