Meanwhile... the bad wood (of course there was bad wood behind the bad tank.) Came out.
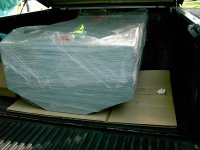
The new tank was manufactured by Atlantic Coast Welding. The "shrunken" size ended up being 126. It appears to be exactly as ordered. The tank is now here.
All last weekend I made up time by finishing the demo. Once the demo was done, I used cardboard to create blanks to fill in the spaces that I removed plywood. The blanks extended from the center stringer to the next stringers over, in the case of the tank cell, it was 31 inches wide. So each blank is about 15 by 18 and covers the entire area from hull bottom to above the top of the tank. The fuel line holes were an ultimate stopping point, as moisture did not collect above them. I went beyond those holes for the repair. The repair was made using 23/32 inch plywood. First the backing fiberglass panel (existing) was coated with resin. The plywood blank was also coated with resin, then a layer of chop strand fiberglass, which was thoroughly wetted with resin, then a second layer of chop strand was laid on that. Then thoroughly wetted. I pre-drilled bolt holes all the way through the existing fiberglass panel, and the blank. Once the blank was covered with two layers of chop strand, the blanks were fitted into place and clamped down using through-bolts. The following day, the through bolts were removed, leaving a solid mass. Next step is to cover the entire repair area with a layer of biaxial glass matt. Original was a thick layer of matt backed by 3/4 inch plywood. Now it is a thick layer of matt backed by two layers of chop strand, new 23/32 plywood, and a layer of matt to cap the tank side. This is considerably more stout than original.
The opposite end of the tank (forward) cell was covered with a 1/4 inch sheet backed by a single layer of chop strand (behind it). I may cover that (tank side) with a layer of biaxial mat too. (It had simply been 1/4 inch plywood, unglassed.
Today should be matt day. This weekend should be tank install.
Engines should be dressed this week.

") but like Chris said to each his own.
but like Chris said to each his own.

")