Aluminum Driveline?

My Engine flange is not fixed. It is part of a pinion shaft that engages the bravo coupler. That it the piece that moves .250"
.

I would look at converting it. I'm not what you'd call a Bravo guy but I'm guessing this may be a conversion of some sort that allows the use of a plug-in transom assy. If you order a new Merc driveline it has the tailstock bolt-on flange.
 

Attachments

  • 100_0269.jpg
    100_0269.jpg
    44.7 KB · Views: 1
  • 100_0270.jpg
    100_0270.jpg
    42.5 KB · Views: 3
  • 100_0268.jpg
    100_0268.jpg
    81.1 KB · Views: 1
There are in fact two spline joints in a bravo drive line. The bravo needs a conventional coupler. It has a carrier that supports the driveline. I am not sure how the input is located but if you say it has 1/4 that is not enough by itself.

Where as the trannie has a flange and the trannie contains a bearing with in to support the driveline.
 
I would look at converting it. I'm not what you'd call a Bravo guy but I'm guessing this may be a conversion of some sort that allows the use of a plug-in transom assy. If you order a new Merc driveline it has the tailstock bolt-on flange.

The drive line itself is or looks the same. The way it is supported is different.
 
The first pic is the "adapter" that bolts to the bellhousing and engages the bravo coupler with its input shaft. It is a Merc part that came on the boat bolted to the 525efi that was in the boat. This is the shaft that has .250" movement fore and aft.

The third pic is the back carrier bearing that the input shaft from the ITS unit engages from behind and has a flange in front.
.
 

Attachments

  • dscn0398.jpg
    dscn0398.jpg
    73.3 KB · Views: 21
  • dscn0399.jpg
    dscn0399.jpg
    73.4 KB · Views: 14
  • dscn0397.jpg
    dscn0397.jpg
    80 KB · Views: 20
Here is the MERC bellhousing adapter unconnected, (sitting on the floor) showing the flange that bolts to the driveline flange. This is all stock Merc;
.
 

Attachments

  • DSCN0376.jpg
    DSCN0376.jpg
    68.5 KB · Views: 4
The first pic is the "adapter" that bolts to the bellhousing and engages the bravo coupler with its input shaft. It is a Merc part that came on the boat bolted to the 525efi that was in the boat. This is the shaft that has .250" movement fore and aft.

The third pic is the back carrier bearing that the input shaft from the ITS unit engages from behind and has a flange in front.
.

I really think the driveshaft is TOO straight !!!!!
I would move the engine a little up in the back .
And other then that leave it !!!!!
Nice set up by the way.
 
I just read thru both 525 and #6 installation manuals looking for specs. Drive line flange variation is recommended to be between 1 and 3 degrees. Surprisingly I could not find a spec for drive spline clearance or any mention of it. I understood the spline should be extended about an 1". not closed. I would measure and make sure it had about 75% engagement. Maybe an older manual has a spec. I will look tomorrow. Maybe Stelling offers a spec.

I have heard horror stories of engine failures when shafts put a end load on the engine.

Thats what i know it is 1 inch out on the driveshaft.
Also def. an angle ,,i was told safest is 2.5-3 * angle.???
 
I had the driveshaft shortened after that picture was taken (pic is old). It is approximately 1.25" out of the slip yoke which is about half of the total movement.

I took the driveline down to the driveline shop today and had it checked after nearly 60 hours of use. Everything is in perfect shape, including the u-joints.

I did this because I could hear a faint knocking in the driveline. Disconnected it to make sure it was not the motor (wasn't). Well, I found the problem tonight. The big ball (.250" balls) bearing carrier that is the first bearing the outdrive input shaft rests in after it passes through the bellows let go. It punched a hole in the bellows as well and let in salt water although none made it past that and into the bilge. the ball bearings are resting in the bellows now.

Now I need to replace that bearing and the bellows. :ack2: This will be my first after 19 years boating. I am happy to have caught it before something really let go like the input shaft or the u-joints on the outdrive itself.

Jim, can you give me a lesson on bellows and bearing replacement? Helmet off first and then it is good access? This is an ITS transom assembly BTW
 
Last edited:
U can get the bearing out with a slide hammer and the bellow u can replace also from the outside .

just pull the drive and lift the bell,,u see how the belloww is in there and should be able to replace it just like that.

after u pulled the bearing,,use a bearing tool and just punch it in place.

should not take u longer then couple hours if its the first time.
Atleast thats on a Bravo,,but ITS should be the same.
 
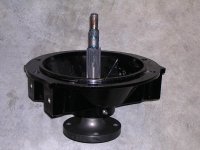
Michael, Nice find on the noise. You can use a slide to pull the gimble bearing but, I prefer and have had more success with a puller. You can buy a bar and threaded rod type from Merc or Pro Marine. http://www.promarineusa.com . I have had the flat bar merc for years but often need to support it with pry bars. The new style uses a piece of box tubing and is offered as a kit instead of pieces. I suggest that one. You will also need the drivers to install the bearing and bellows sleeve.

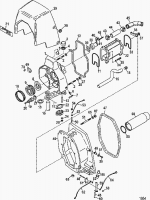
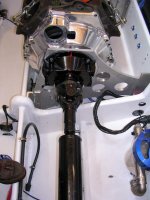
Pretty easy job. Just be patient and have a stool to sit at the right height. The bearing gets changed while the bellhousing is still in place. Either before or after bellows job.

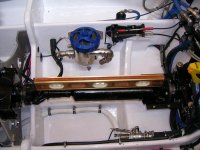
The bellows part is best done by removing the shift cable although it is not nec. Might as well change the shift bellows too. The water hose that connects the bell housing to the inside is something I suggest you change whether it needs it on not. Mostly because of the potential problem of salt pinching it and restricting flow. You will be right there and it will never be easier. There is a special tool for the retainer you will need..The point of the hose change is to clean the salt out of the housings around the outside diameter or the hose. Clean and repaint surfaces.

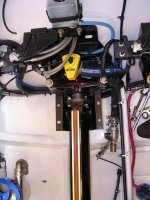
Back to bellows. Note clamp locations. Clean glued side with emery and solvent. The shift cable bellows fwd surface needs cleaning too. Clean aft side and repaint as needed. Install fwd first with top as marked on bellows. Use bellows adhesive or super weather strip adhesive as directed and clamp { fwd side only}. Secure not do not over tighten either bellows clamp. Especially the shift one. It will try to walk off. Both have a distinct slot to position clamps. I suggest a long @18" 1/4 long extension with swivel.

Install the bellhousing. The second groove in from the end of the bellows rides on the protruding ring of the seal surface. install dry. Use driver to install sleeve also dry. It says a drop of soap , I use spit if nec. Complete shift cable and water hose assembly.
I always find the clean and prep time matches the actual work time. Take the time to get all the salt off. If bearing got wet cross bearings should be changed too. Clean and grease yoke at seal surface.

Best of luck. I would by a merc service manual. If I were you. It may not be needed now but, it is worth every penny.
 
Last edited:
Best of luck. I would by a merc service manual. If I were you. It may not be needed now but, it is worth every penny.

I'm with Jimmy!!! Even if they're old out-dated manuals it's good to have them laying around for reference.

I get a lot of my manuals from the marina when they throw out the old ones when the new editions are released! :driving:

Also, if you know someone, try to get the CD's!!!!!! You wont be able to get access to MercNet unless the people you know are silly enough to give you the passcode but you'll have all the parts break-downs for quick reference when you need to order stuff!!!! ;)

Believe it or not, I still have a microfische set!!:willy_nilly:
 
As for the slide hammer....this is one of those cases where I found the bigger the slide hammer the better for the job!

I made an instalation tool out of an old TRS bearing race, u-bolt flange, long azz bolt and a seal assembly from an Alpha drive!!! It ain't pretty but it was free and it works!!!

Also, if you haven't done so already, make yourself one of these shift cable snakes!!! It's made by using the "inner" from an old shift cable and cutting off the threads of the adjustment rod.... To use it you disconnect the shift cable as you normally would to pull it out....(Don't forget the plastic heat/vibration spiral crap) Then pull the inner out of the old shift cable, go inside the boat, thread this tool into the old shift cable "outter", then go outside the boat and pull the shift cable thru.... Disconnect your snake, install it on the new shift-cable, thread it thru the shift bellows then go inside the boat and pull the cable the rest of the way thru with your snake! Works like a charm! ;)
 

Attachments

  • Tools%20007%20%28Large%29.jpg
    Tools%20007%20%28Large%29.jpg
    40.4 KB · Views: 3
  • Tools%20008%20%28Large%29.jpg
    Tools%20008%20%28Large%29.jpg
    53.1 KB · Views: 4
  • Tools%20010%20%28Large%29.jpg
    Tools%20010%20%28Large%29.jpg
    92.2 KB · Views: 3
Wow guys; DD, Chris, Geronimo, Thanks for the help, Jim great blow by blow tutorial. Thank you. :sifone:

I have a mail into Rick at CP for all the merc parts, Sounds like I should be able to handle it. I will have one (or several) more tool(s) in my tool box :USA:

Which bearings are the cross bearings?
 

Attachments

  • Marine.png
    Marine.png
    13.7 KB · Views: 4
  • Marine 2.png
    Marine 2.png
    13.3 KB · Views: 2
Rick @ CPPerformance just mailed me, everything on it's way. I guess I know what I am doing Friday. :driving:
.
 
Back
Top