Pantera 24 transom replacement

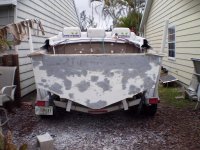
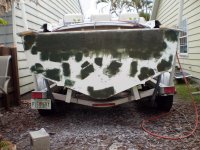
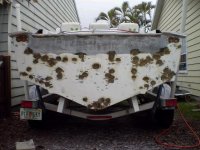
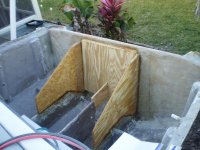
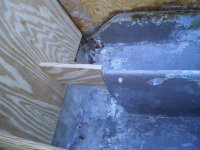
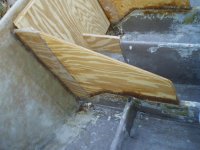
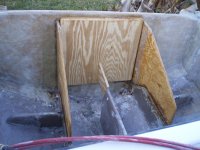
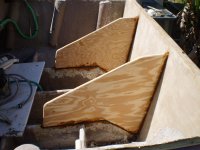
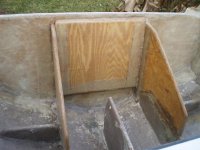
The pics are alittle deceiving, the glass is as wet as it would get, kept rolling and rolling. this 1708 is tough stuff to wet out. There are no air pockets, some spots didnt look as wet as I would have liked them, but they were wet, stuck great, and hard as a rock this morning. I lied in the above post, thats not actually done, I have one more layer to add this morning. As far as the fit, it does not have to fit real tight, but should follow the same shape as your hull, so that the gap is consistent. If you put the wood all the way to the edge, there will be no bond on the sides. I went with approx. a 1/4" gap, and filled with the putty Pepe is talking about, there is more high tech things nowadays, but the sawdust putty Pepe had put in mine was the only thing taht survived, so that is what I went back with, mixed with and added some techie stuff for good measure.

Rick

Very cool!
I guess I never thought of the gap for the bonding area. Now that you explain it, it makes sense.
I guess just coming from my carpenter background, I was sort of blinded by what I know, and not thinking in these terms.
Big project Rick, keep plugging along.
 
Didnt get the knees in over the weekend, but did get the outside skin started. Had today off from work to get the taxes done, and when I got home from the accountant, threw the deck piece back on to measure for the knees, and new back seat bulkhead.
 

Attachments

  • P4160016.jpg
    P4160016.jpg
    118.8 KB · Views: 34
  • P4160017.jpg
    P4160017.jpg
    88.2 KB · Views: 45
  • P4160018.jpg
    P4160018.jpg
    98.8 KB · Views: 34
  • P4160019.jpg
    P4160019.jpg
    79.1 KB · Views: 36
Few new pics from today, got the knees cut, and started the install, and added a 3rd piece of 3/4 where the motor will mount spanning the knees. considering adding a 3rd knee on the center stringer, that is just a wedge in there now to hold the plywood while the putty hardens, will finish laying the glass tomorrow.
 

Attachments

  • P4200025.jpg
    P4200025.jpg
    110.5 KB · Views: 31
  • P4200024.jpg
    P4200024.jpg
    102.6 KB · Views: 27
  • P4200023.jpg
    P4200023.jpg
    98 KB · Views: 27
  • P4200022.jpg
    P4200022.jpg
    105 KB · Views: 31
  • P4200021.jpg
    P4200021.jpg
    97.7 KB · Views: 26
  • P4200020.jpg
    P4200020.jpg
    99.2 KB · Views: 30
Looking good Rick!
Thanks for providing the pics. It's helping to motivate me.
Now if I just had some time.
 
Rick --- LOOKING GOOD !!!


You`ve always impressed me. When you tackle a project, you do not "F" around.
Looks like excellent work. I would add that 3rd, center knee. Nothing wrong with over-building something.


KEEP THE PICS COMING !
 
Rick --- LOOKING GOOD !!!


You`ve always impressed me. When you tackle a project, you do not "F" around.
Looks like excellent work. I would add that 3rd, center knee. Nothing wrong with over-building something.


KEEP THE PICS COMING !

Thanks Don, it will be ready for the 300xs, as soon as $$ allows:driving:
 
Didnt accomplish much yesterday, Bit I did manage to get a layer of 1708 on the knees and such, will get them wrapped up next weekend, but gotta get more resin first. Also started the finish work on the transom height extension.
 

Attachments

  • 30.jpg
    30.jpg
    91 KB · Views: 26
  • 31.jpg
    31.jpg
    83.7 KB · Views: 23
  • 32.jpg
    32.jpg
    101.7 KB · Views: 28
Nice! I finally got all the tune up stuff done and had my 24 out yesterday (in your honor of course!) Keep up the good work!
 
Havent done much work in the last 2 weeks, but did manage to get all 57 holes patched up, ground out, glassed in, filled with fiberglass reinforced filler, then a coat of 3M premium marine over the whole transom, and sanded off to blend it all.
 

Attachments

  • 43.jpg
    43.jpg
    129.5 KB · Views: 31
  • 42.jpg
    42.jpg
    124.6 KB · Views: 36
  • 41.jpg
    41.jpg
    134.1 KB · Views: 38
  • 40.jpg
    40.jpg
    106.6 KB · Views: 31
Shot a coat of primer on there to see if I could see any imperfections, looked pretty good, so I shot a black guidecoat on, and will sand again this weekend.
 

Attachments

  • 44.jpg
    44.jpg
    97.6 KB · Views: 45
  • 45.jpg
    45.jpg
    92.6 KB · Views: 38
Back
Top