Ilmor 725/Indy build from the beginning

The indicator use a sensor will work anywhere that there is rotation. If you can't attach them directly to (or in line with) the shaft, you could always create an arm-style linkage.

Ilmor is not in the trim tab or sensor business, but I believe that Livorsi is looking into this technology.
 
Got the old dash and wiring stripped out in preparation for the Ilmor stuff, the bilge painted, and the hatches bonded together this weekend. If you've never used Plexus before, be prepared with lots of ventilation. That stuff is intense, but it stuck two fiberglass parts together like they were made as one.

I'm beginning to see the light at the end of the tunnel now...
 

Attachments

  • 20100425_BilgePainted.jpg
    20100425_BilgePainted.jpg
    37.6 KB · Views: 42
  • 20100425_HatchesPlexus.jpg
    20100425_HatchesPlexus.jpg
    49 KB · Views: 34
  • 20100425_HatchesCarbon.jpg
    20100425_HatchesCarbon.jpg
    56.6 KB · Views: 39
After a couple of weeks delay due to pesky business travel, the final push starts for Smith Mountain Lake in two weeks. The transom is now in primer and ready to paint, and the water pickup has been sorted out.
 

Attachments

  • 20100427_TransomB.jpg
    20100427_TransomB.jpg
    73.3 KB · Views: 22
  • 20100505_PickupRear.jpg
    20100505_PickupRear.jpg
    90.1 KB · Views: 27
I have the vids clips but wanted to combine 3 into one vid but they are .MOV files and im not that computer savvy to get them converted for the movie maker. They are too huge of files for me to email also!
 
WE'RE PAINTED!!
Now things can start going back on for real...
 

Attachments

  • 20100506_TransomPaint.jpg
    20100506_TransomPaint.jpg
    82.5 KB · Views: 27
A great day. L-O-T-S of unseen work accomplished as well. All this stuff is on for good now. :26:
 

Attachments

  • 20100508_Transom1_Tabs.jpg
    20100508_Transom1_Tabs.jpg
    93.4 KB · Views: 30
  • 20100508_Transom2_Gimbal.jpg
    20100508_Transom2_Gimbal.jpg
    108.3 KB · Views: 43
  • 20100508_InnerPlate.jpg
    20100508_InnerPlate.jpg
    81.1 KB · Views: 36
  • 20100508_Transom3b_Pickup.jpg
    20100508_Transom3b_Pickup.jpg
    77.5 KB · Views: 31
Getting there now. It's starting to look busy.

CMI's done with the tailpipes. They made the baffles removable for me, so we can adapt to whatever noise regulations are in effect wherever we happen to be. (I think that I'll start off at "5-inch open cannon" level and see how that works...)
 

Attachments

  • 20100510_Bilge.jpg
    20100510_Bilge.jpg
    133.7 KB · Views: 32
  • PICS 003_Crop.jpg
    PICS 003_Crop.jpg
    80 KB · Views: 26
Getting there now. It's starting to look busy.

CMI's done with the tailpipes. They made the baffles removable for me, so we can adapt to whatever noise regulations are in effect wherever we happen to be. (I think that I'll start off at "5-inch open cannon" level and see how that works...)

Wow, thats gonna be LOUD!! :cheers2:
 
Getting there now. It's starting to look busy.

CMI's done with the tailpipes. They made the baffles removable for me, so we can adapt to whatever noise regulations are in effect wherever we happen to be. (I think that I'll start off at "5-inch open cannon" level and see how that works...)

I see in the first picture, u don't have a valve on the water pickup ?????

I would think this over !! LOL

Other then that ,,,NICE and i bet also its going to hammer away in peoples ears...which i love !!!!:sifone:
 
I see in the first picture, u don't have a valve on the water pickup ????? I would think this over !! LOL...
I did; I should have ordered the pickup with the male 1" NPT threads. Looking at the slip-on version, the most likey point of failure is where the 1-1/4" tube is welded to the transom flange, in which case the valve would not help. Anyway, I'm not even sure that I could reach down into that area once everything is installed! :ack2:
At least I have a valve on the inlet side of the strainer, the connections are double-clamped 180 degrees apart, and I'm using the heavier 2-wire green stripe Shields hose... :cheers2:
 
"Optional" baffle setup number one.


Go CMI! You guys rock!
 

Attachments

  • PICS 005_Sm.jpg
    PICS 005_Sm.jpg
    141.8 KB · Views: 31
  • PICS 006_Sm.jpg
    PICS 006_Sm.jpg
    157.3 KB · Views: 28
A HUGE Thank-you to R'Addiction!!!

John hung in with me for two solid a$$-busting days to get this thing done. He put up with everything (including me getting grumpy a few times...) and we lit it up at 8:15 PM Sunday night.

(Yes - It's awesome....)

A few small finishing jobs to do, but I hope to run it Tuesday night.

<phew>
 
"Optional" baffle setup number one.


Go CMI! You guys rock!

NOW that is fkn cool !!!!!!!!!:cheers2:


about the the other thing with failure on the pick up...most likeley ( as far as i know ) the hose slips off at press spyke's !!!!!!!!!!!!!:eek:

VALVE 100% !!!!!!!!!!!!!!!!
 
Engine photo courtesy of R'Addiction. The engine is lacking the decorative shrouds and still has the protective film on the intake and heat exchanger. Once we're "really done", I'll put the bling back on and peel off the film. I'm very happy with the clean look of the bilge; there's very little visible wiring and plumbing.

...and I WILL make the hatch more presentable soon.
 

Attachments

  • 20100516_TailB (Large).jpg
    20100516_TailB (Large).jpg
    74.8 KB · Views: 24
  • 20100516_Engine_(Small).jpg
    20100516_Engine_(Small).jpg
    63.9 KB · Views: 39
  • 20100516TransomB_(Large).jpg
    20100516TransomB_(Large).jpg
    107.7 KB · Views: 36
  • 20100517_Transom (Large).jpg
    20100517_Transom (Large).jpg
    107 KB · Views: 45
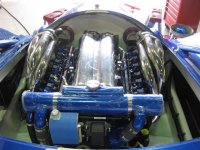
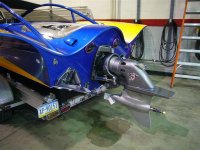
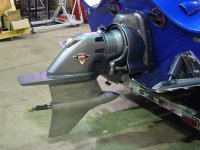
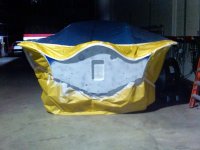
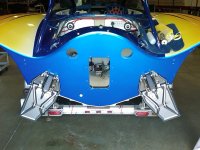
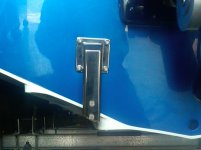
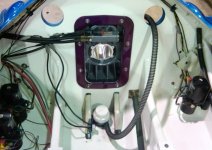
I got the NMEA 2000 network properly terminated, so I was able to configure the engine and the Garmin digital display. Very cool stuff. I also installed the air cleaner, which contains the intake air sensor, so the engine's a lot happier now. The fluid levels are checked after running everything, and the transom shroud is on. The props have been test-fitted, and the lettering is going on today.

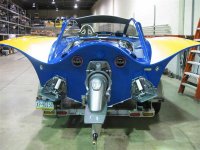
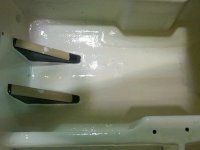
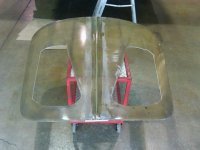
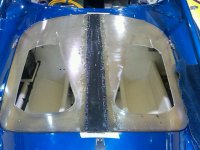
We're down to some finishing touches on the engine hatch, installing the driver's seat, rear seat upholstery, carpeting and we should be good to go for a shakedown on Blue Marsh Lake Wendesday evening. Here's hoping it all goes OK. I've missed running this boat for almost seven years... :hurray:
 

Attachments

  • 20100518_Drive (Large).jpg
    20100518_Drive (Large).jpg
    92.3 KB · Views: 19
Looks awesome Chuck. Hope to see (and hear) it sometime this summer. :cheers2:

Some of the pictures make you wonder if it'll float with all the hardware on the back :willy_nilly: j/k
 
Back
Top