GlassDave earns his Bat Cape

C_Spray

Charter Member
Hats off to GlassDave for hauling his azz over here to PA and overseeing a tricky project on my Batboat. I couldn't be happier with the way the whole thing turned out, and we all had a few laughs along the way. I'll leave it to Dave to post his favorite shots, but some of the details are already posted on the Ilmor 725 thread in General Discussions.

Thanks, Dave! :hurray:
 
Thanks Chuck glad i could help out. It was good to put our heads together to come up with a solution to a somewhat technical and out of the ordinary rigging situation. Cant wait to get a ride in that rocket ship at jammin on the james.


Again thanks for the hospitality glad i could help the project.
 

Attachments

  • C spray batboat 026.jpg
    C spray batboat 026.jpg
    634.7 KB · Views: 58
  • C spray batboat 032.jpg
    C spray batboat 032.jpg
    657.8 KB · Views: 68
  • C spray batboat 027.jpg
    C spray batboat 027.jpg
    606.4 KB · Views: 63
  • C spray batboat 029.jpg
    C spray batboat 029.jpg
    618.8 KB · Views: 30
hay dave are trying to draw mickey mouse on the back of that boat :huh::cheers2:: good jop . nice project. cant wait to see wt you do next:cheers2:
 
Its all in the setup. When i got there the first thing we did was to bond in a first piece that was the exact size of the original hole but only about 5/8th inch thick. The existing fiberglass and wood was cut back and recessed and "shelf" in two new inner and outer pieces that were bagged on. The first bonded in piece effectively gave us a solid platform to work out from. Bagging transoms can be very tricky, you never know how it was done originally and leaks can come from anywhere. I had one persistent air leak on this one that came from an old bilge pump mounting hole that i missed. Had to find and isolate it quickly.

The outside was also kept flat by carefully cutting the laminates to match the scarf as best you can. We got really close on this one. Chuck put a few miles on my Kevlar shears :D
 

Attachments

  • C spray batboat 016.jpg
    C spray batboat 016.jpg
    595.2 KB · Views: 29
  • C spray batboat 011.jpg
    C spray batboat 011.jpg
    596.3 KB · Views: 32
  • transom2.jpg
    transom2.jpg
    57.2 KB · Views: 58
Nice touch huh . . . . feel free to print one out for yourself Artie :D
 

Attachments

  • glassdave.jpg
    glassdave.jpg
    43.4 KB · Views: 10
Last edited:
Hey, Dave - If you come back over this weekend, I'll pay you in tacos and margaritas do all the grinding and leveling...
 
Good deal for you C Spray,if I was the glass guy that would cost you a bunch..................offer Dave Little debbies and club soda,I bet that will be a deal lol (sorry dave its an open forum lol)
 
Here's a section of the finished transom. THAT ought to do it...
 

Attachments

  • 20100404_Cutout (Large).JPG
    20100404_Cutout (Large).JPG
    61.4 KB · Views: 15
  • 20100404_Cutoutb (Large).jpg
    20100404_Cutoutb (Large).jpg
    83.4 KB · Views: 16
oh yea . . . . forgot about that. No prob with the Kevlar then huh. What brand and part number was that bit? Gonna hafta get me one of those.
 
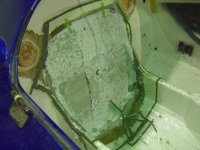
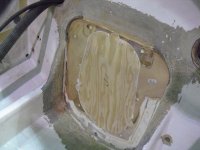
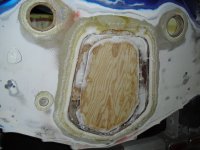
It wasn't happy with the Kevlar, but the hole is cut, so I guess the bit wins.

Bosch #85911MC, 1/4" diameter x 1" cut length Upspiral straight bit. About $20 from Lowe's. It's 2-1/2" overall, so if you pull it out to cut through 2", there's not much left in the collett, and the vibration tends to make it walk out. If I can find a longer one, I'll let you know. I'm in the market for one, after I knocked the router off of the bench and shattered my bit.....

McMaster numbers:

27395A95 ($21.75): 2-flute, 2-1/2" long, the same as I used
8711A11 ($49.85): 3-flute, 3" long
3334A13 ($79.73): Diamond pattern, 2" long, specifically designed for cutting carbon
8785A24 ($14.12): Diamond pattern, 2" long, specifically designed for composites
8796A12 ($36.95): 40-grit diamond coated, 2-1/2" long, for composites and ceramics.

The last one (8796A12) is probably the best choice.
 
Last edited:
Back
Top